It's All About What The Audience Sees

One of the first subjects I studied in college was magic.  Specifically, stage magic, as opposed to supernatural magic or Magic: The Gathering.  The latter wasn't first published until a bit later in my college career, and the former didn't offer a full four year degree.  You can get all sorts of degrees in it now, but instead of "witchcraft" it's referred to as "data analysis."*

Anyway, I quickly learned two things about sleight of hand.  First, the texture and finish of the cards significantly impact the mechanics of card manipulation.  Second, the audience's perception of magic is driven by many factors beyond your sheer mechanical skill.

While working on Film Tycoons I've greatly enjoyed the search for a manufacturer -- this has been a great learning experience and now that we're in the final stages the selection of printing materials is a critical task.  A few companies have been very responsive to my inquiries but Longshore Limited of Hong Kong shines.

Not all cards are created equal.  Magicians prefer to use Bicycle and Bee back cards because they have a very high quality air finish with just a slightly rough texture.  In short, they're excellent for card manipulations.**  Even a non-magician can tell the difference between Bicycles and a dollar store deck -- pick up ten cards and fan them.  Bicycles (and Bees) will spread evenly and the cards glide against one another.  Lower quality cards will stick to each other and clump.

Not surprisingly you'll find a wide range of paper and finish qualities when shopping for card printing.  When you're looking at mass production you really want some basis for comparison beyond, "I really like Bicycle playing cards, do you have something like that?"  Longshore has many permutations available and I can't tell you offhand the difference between a 330g black core and 250g white core cards.  Last Wednesday night I mentioned this in an email to Nancy, my brilliant contact at Longshore.  By Monday morning FedEx had delivered a box of samples to my house.***

That's overseas shipping in two business days, and I've yet to actually place an order.  In fact, as potential customers go I'm probably a real pain in the neck.  As we've iterated on the game development process I've updated our component list numerous times and Nancy cheerfully provides me with new quotes every time.  She's also patiently answered two dozen questions about the production process, recommended freight forwarders, and provided suggestions and options. 

Different experience with another company.  (This isn't another manufacturer competing for our Film Tycoons business, it's a provider here in the U.S. with a service that we needed pretty quickly for another aspect of the game development.)  I placed an order with them last week.  The automated reply estimated a shipping date of March 10th.  Okay, we can wait that long.  Last night I thought I'd check the provider's system to see what information I can get about my order status.  Turns out they do have ongoing updates -- my order is now estimated to ship on March 13th.

I'm not happy that my order is now arriving three days later.  My perception of the company's reliability just took a hit.  And since I had to find that information myself rather than being notified, I'm certainly not feeling valued. 

I'm confident that both Longshore and the other company can deliver -- that's the mechanical part of the process.  Longshore, however, demonstrates all those other behaviors which positively influence my perception of the company, and any magician will tell you that both those things are necessary before magic happens.


* When I started college the only computer discipline offered was "Computer Engineering."  Yeah, we didn't even have Business Information Systems yet.  You sure as hell couldn't major in "Creating Gaming Apps for iOS."

** If you'd like to learn some fun card manipulations to amaze your friends, I strongly recommend Jeff McBride's video series.  He's an amazing magician and his how-to videos are actually excellent teaching aids.

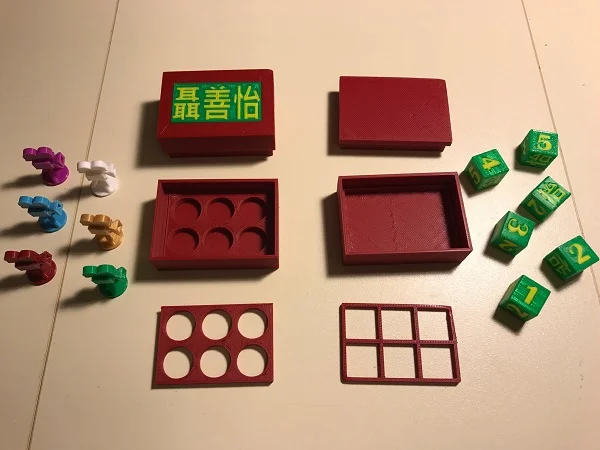
*** I was going to share a picture of the sample package from Longshore but I haven't asked their permission, so I decided not to.  Take my word for it that this isn't just an envelope with four or five cards in it -- it's a box full of cards, pawns, dice, timers...like a Loot Crate for aspiring game makers. 

The Business Of Being Funny and Some Questionable Priorities

Questionable priorities first.  PricewaterhouseCoopers has hired bodyguards for accountants Brian Cullinan and Martha Ruiz, the unfortunate pair who were responsible for handing over the Academy Award envelopes.  PwC is taking very seriously death threats the pair have received because of the mix-up with the Best Picture presentation.

That's right, death threats.*  Apparently the most crucial issue facing the nation today, the one that requires immediate, violent resolution, is the incorrect dissemination of envelopes at an awards ceremony.**  Now you know.

Speaking of movies, you're probably aware that I'm in the finishing stages of a board game involving a movie theme.***  The scripts, directors, and actors in Film Tycoons are parodies of real films and people, and two weeks ago I went through all the cards (300 of them) to try to ensure they were a) funny but b) not offensive. 

Possibly the best advice I've ever received.

Possibly the best advice I've ever received.

The scripts were hard enough.  It's amazingly difficult to be funny 110 times in a row in four sentence increments.  Remember the quote, "Sorry I wrote such a long letter; I didn't have time to write a short one?"****  It's certainly a true phenomenon in humor -- it's much easier to be funny when you've got more words/time to do it.  That's especially true when you're taking care not to be mean.  In Film Tycoons we only included actors and actresses we like, so we wanted to keep the humor good-natured.  Not surprisingly, it's much easier to make some of the audience laugh when you make another part of the audience cry. 

Years ago I saw an interesting summary of the creative process for Mystery Science Theater 3000.  The crew described sitting at a conference table as they watched a movie, everyone throwing out random lines that came to mind.  Someone would track all the brainstorming, then they'd organize, decide to eliminate some options, and do it again.  And again.  And then refine.  And then polish.  By the time they actually recorded the show the creative team (which included the live actors) were probably awfully tired of the film they were panning.  I imagine they also started second-guessing the lines that seemed funny five days earlier, before they were repeated twenty times.

Overall, being funny isn't always fun, and at some points it feels like solving quadratic equations would be more entertaining.  But at least there's the occasional no-brainer when a movie like Avatar makes the parody process almost criminally easy.

Avatar: the extremely rare element is called "Unobtanium?"  How do you come up with this stuff?


* I don't think there's any way I would have believed this if I hadn't seen the movie The Accountant, which made me realize exactly how devious these people are.  But it also begs the question, why do they need bodyguards?  Apparently ninjitsu and explosives are required training for accountants.

** Why the need for violence?  I have a kinder, gentler proposal: track down the ancestry of the two accountants, identify the countries whence they came, and build a GIANT WALL to keep any more of these nefarious people from entering the United States!  That'll protect our awards shows!

*** Since you're reading my blog and I won't shut up about it...

**** Like many pithy quotes, I've seen this one attributed to a bazillion people: Mark Twain, Abraham Lincoln, Winston Churchill...the list goes on.  Apparently Blaise Pascal is the earliest actual attribution.  That's right -- math geeks are funny!

Maker Space? What's That?

I'm so glad you asked.  I just happen to have an example.

A friend and I designed a tabletop game and reached a distinct milestone -- the game mechanics had been tested and re-tested (and re-tested and re-tested), the rules were solid, and all the card content was created.  Before sending the digital files to a printer for a production quality prototype we had one remaining step: work with a Real Artist to finalize the color scheme, graphics, and layout for the physical elements of the game.  We really wanted a physical copy of our concept board to examine with the artist.

Challenge: how do you print a 30" x 24" board at home?  We could print on standard 8.5" by 11" paper and piece it together, but the pieced-together look is distracting when you're trying to look at design quality, or sharing the board with people at a game design event. 

Welcome to the North Richland Hills Maker Spot.  This Maker space is hosted at the public library and made possible by a grant from the U.S. Institute of Museum and Library Services, as well as other organizations.  The best short description is "community workshop."  Most Maker spaces I've seen focus on two concepts: make available equipment that might be too expensive or otherwise prohibitive to have individually, and to facilitate the propagation of knowledge.

Case in point, our Maker Spot has an HP large format printer.  It prints on 36" rolls of paper, exactly what we needed for the game board.  It's connected to a Mac that has the full Adobe suite, and current price is $1 per linear foot of printing.  That's it -- copies of the game board for $3.  Considering that our next best offer was $40 with a half-day turnaround at a local print shop, this is more than a bargain.  Of course, I'm also unlikely to have a 36" printer at home -- the best deal I see on one on Amazon is $8,500.

Similar situation with other technologies.  The Maker Spot has 3D printers, a long arm quilting machine, an audio/visual production lab, electronics and woodworking equipment, and all manner of learning kits.  And there are classes.  Sharing of knowledge is a staple activity of all Maker spaces, and ours has a fantastic array of free classes -- you can learn sewing, 3D modeling, Arduino, Adobe, Raspberry Pi...not to mention Internet safety, small business start up, electronic privacy, and more.  My daughter and I have taught a few classes there on building devices in both Minecraft redstone and physical electronics. 

Different Maker spaces offer different equipment and classes, depending on the local need, interest, and availability.  I've seen some with full-scale auto garages, others with more electronics than a Radio Shack warehouse, and some offering pottery and crocheting classes.  Ours is definitely an invaluable community resource, especially if you're printing board game prototypes. 

Modularization, the Musical

Editorial note: I didn't actually write a musical about modularization.  I just liked the title, and have a theory that Melissa Schmitz only reads my blog if there's alliteration involved.  Sorry for misleading you.

I combined a few projects today to make a gift for someone, as well as some potential prizes for people when we launch our Film Tycoons Kickstarter campaign.  I've been 3D printing personalized dice for a long time and shared earlier the custom pawns I made for the game -- yesterday I built a box specifically for these types of toys. 

But not just any box!  It's a modularized box!  Or rather, the OpenSCAD code to generate the box is modularized.  The point: efficiency of flexibility.  The OpenSCAD script results in one command for each of the box parts: the bottom, the lid, the part-specific insert, and the name plate. You can produce many configurations of the box with hardly any time required, no cloning, re-modeling, etc.

Eric Hallberg, if you're reading this, feel free to borrow the technique for the automobile industry.  Seriously, no charge.  Happy to share.  :)

The lid changes size simply by changing a variable.  The dice fit in the box with the default lid size, so rendering the lid is as easy as typing boxlid().   The Film Tycoons pawns are taller, though, so boxlid(14); makes a taller lid to accommodate.  Likewise, the nameplate is a separate piece which fits somewhat snugly (and even more so with a little epoxy) to the lid; I could have printed the name directly in the lid, but the separate plate allows for a lot more flexibility.

The round or square inserts -- similar approach.  Specify the size of the holes in the insert and the code centers them appropriately. Most important here is that by printing the insert separately the box bottom can be printed ahead of time.  (I didn't take the extra step of combining the round-hole and square hole inserts in a single code block, but I'll likely do that before blogging about the actual code.)

Odd "box" trivia: the Simon & Garfunkel song The Boxer is NOT about a dog after all!

Odd "box" trivia: the Simon & Garfunkel song The Boxer is NOT about a dog after all!

Oh, and the length and width of the box?  Also variable-driven.  If I needed ten dice for that Super Secret Professional Double Yahtzee League, it's just a matter of tweaking two numbers and you suddenly have a ten-die box. 

The only part of the project that can't be tweaked and re-printed in seconds* is the Chinese writing.  That's a bigger challenge than putting text on the nameplate; the characters have to be brought into another program as a graphic, converted to a format OpenSCAD can understand and extrude as a 3D object, then incorporated into the model.  Another topic for a later blog.

And Missy, I still feel slightly guilty about the alliteration/musical thing, but I'll try to make it up to you.  Maybe with some 3D printing haiku or something.  You're welcome in advance.


* That's not exactly true.  Nothing 3D prints in "seconds."  At least, not in so few seconds that it wouldn't be more appropriate to measure in minutes or hours.  The more accurate way to say this would be, "...tweaked and started re-printing in seconds."


Modular Printing to Avoid Support

I decided to model some custom pawns for Film Tycoons this weekend.  The "old fashioned" film camera might be the most iconic (non-copyrighted) symbol of American film, so it's the most obvious pawn choice.  It also has a very pleasing silhouette; you glance at it and know immediately what it is.  That outline structure causes some 3D printing issues, though -- there are a lot of unsupported overhangs at angles which can't be printed.

Quick lesson for those who aren't familiar with 3D printing: an unsupported section is any bit of plastic which does not have plastic directly beneath it.  Consumer grade 3D printers work by laying down layer after layer of plastic.  (The layers in these pawns are .2mm tall.)   The layers can gradually shift as the print builds; up to a 45 degree incline is quite safe and you can get even steeper if you print slowly.  Hence, the tripod legs will print with no problem.

Check out the front of the lens housing, though.  That's 90 degrees to the print bed and hanging in thin air, about a centimeter above the table.  Try to print that and you're going to end up with a big glob of plastic

One way to handle this is by printing support.  The slicer (the software which translates a 3D model file to code for the 3D printer) can add in columns of plastic with a more diffuse density and a weak connection to the layer being supported.  The support columns break off easily from the part.  However, supports increase the overall print time, they can leave rough spots on the surface of your model, and they can increase risk -- if the support doesn't have a wide base it can break away from the print bed and cause your print to fail just as easily as the finished part itself.

Instead of printing one solid part with support I decided to cut my model into three pieces, each of which could be printed with no support, then glue them together.  From the base to the connecting point on the tripod was one logical piece, the camera body and lens are another, then the reels. 

I hate gluing flat pieces together, though.  No one wants to hold two pieces together for ten minutes while the glue dries, right?  Especially if there are two gluing operations per pawn and I'm printing six pawns.  That's...a lot of time that I could be playing Ruzzle. 

The answer: pegs and holes.  (Ikea figured this out a long time ago, too.)  The camera housing has a hole on both top and bottom.  the tripod and reels each have a peg.  Besides making the gluing easier, this helps ensure that the pieces are aligned the correct way. 

I actually turned this 90 degrees to the left for printing, so that the lens pointed straight up.

I actually turned this 90 degrees to the left for printing, so that the lens pointed straight up.

I also use this little technique when slicing larger prints into pieces that will fit on the printer.  My Maltese Falcon is an example of that; I wanted it to be the same size as the movie prop, which meant slicing it into three parts.  Peg holes helped keep his parts flush at reassembly.  (Clarification: I didn't create this awesome Falcon model; I printed someone else's model from Thingiverse.)

A couple of other interesting production notes.  First, the to make the peg/hole arrangement really work well, the holes should be cylinders with different diameters at the ends.  In this example my pegs have a diameter of 4.5mm.  The holes have a diameter of 5mm at the opening and 4.6mm at the back, providing a snug pressure fit.  The pieces actually stay together pretty well without any glue.

Second, note the orientation of the housing -- I printed it with the back side flat against the print bed, lens pointing up in the air.  Why?  The peg holes have a 90 degree overhangs.  The one on the bottom could potentially sag during the print.  Probably not a big worry in this case because the widest of those "roofs" is only 4.6mm, but it's still a good practice.

Sometime soon I'll post the OpenSCAD file for this model either here in my site or on Thingiverse.